April 16, 2009

A Thousand Shades of Awesome !

0 comments

Skype for iPhone and iPod touch is about a thousand shades of awesome!


Finally, the king of VoIP applications has arrived in the App Store allowing iPhones and yes, even iPod touches, to enjoy free phone calls and instant messaging.

The free Skype app isn’t the first VoIP iPhone app to offer this functionality, but it is without a doubt the very best of breed. The interface is responsive and intuitive. The icons are sharp. The audio quality is superb.

Best of all, everything just plain works as expected. No bugs, no frustration, just pure simplicity. Skype works on all iPhones and even second generation iPod touches using the earbud accessory with the built-in microphone.

Current Skype users will appreciate the fact that this is not a crippled version of Skype’s desktop application. Instead, this iPhone app is an almost duplicate, feature-to-feature adaptation of the desktop version. Skype is a solid app and one of the must-have communication utilities every iPhone and iPod touch owner should add to their home screen.


The Skype iPhone app allows various kinds of calls and messaging across it’s robust VoIP platform. This includes calling landlines as well as other Skype users. Skype-to-Skype calls are absolutely free of charge, but do require that both the calling party and the receiving party are using the Skype app. And even though Skype will charge you to call landlines (and mobile in some countries), the cost savings per minute is much less than your carrier’s calling plan. Either way, you can’t lose with Skype. It’s a free app that saves you money.

In addition to phone calls, Skype also supports instant messaging across 3G, WiFi, GPRS, and Edge. You can see who’s online at anytime then instant message them. This also requires both parties to be running Skype. In our tests, instant messaging works great unless you’re trying to chat to more than one person at a time which means constant toggling between them.

The current version of the Skype iPhone app only works on WiFi for phone calls, although some iPhone developers with the latest SDK are reporting that Skype running on iPhone 3.0 works well on 3G. Hopefully this won’t change when iPhoen 3.0 is officially released this summer, although it’s easy to see how this might not be included given Apple’s relationship with AT&T.

Currently, the biggest drawback to using Skype has to do with the limitation in the iPhone that prevents apps from running in the background. This means you can’t get alerts when others want to contact you unless you have Skype open. This may be addressed for the iPhone 3.0 release this summer which is reported to support background processes and alerts.

Jailbreakers beware that the latest version of Skype will not run on jailbroken devices. If you do try to run this app on a jailbroken iPhone or iPod touch, it will crash your device. Skype chose not to address this issue for jailbreakers and instead they added a disclaimer to the app stating that it is only supported on an unmodified iPhone OS.

Some Skype users seem upset that this iPhone app, unlike it’s desktop sibling, does not support video chat. We’re not sure why this is an issue for some users because even if the app did support video, the iPhone’s camera is on the wrong side of the hardware. This makes video chat utterly pointless on the iPhone, and completely useless for iPod touch users.

All these little nits aside, the Skype app is an awesome addition to your iPhone or iPod touch. You’ll find it extremely useful if you spend a fair amount of time on Wi-fi networks, saving you money with free Skype-to-Skype calls and cheap calls to land lines. The upcoming release of iPhone 3.0 could also mean even more Skype usage over 3G and the ability to keep it running all the time. And if Apple eventually puts a camera on the other side of the iPhone, Skype could dominate our calling habits by enabling real-time, mobile video chat.

January 19, 2009

Switch off the WYSIWYG Editor when inserting HTML code

0 comments
The default Joomla WYSIWYG editor is great when you want to be able to format your content articles. However, the editor will strip off any HTML you try to insert. Therefore, to insert certain HTML code you need to make sure that it is switched off.

To switch off the Editor for the current user you need to logon on to the Administrator backend, click to Site > User Manager. Click on the account you logon with, and choose No WYSIWYG editor. Once this has been done, any content items you create / edit will feature pure HTML which will not get stripped off by the Editor.

January 17, 2009

Back up your Joomla website

0 comments
Ok we all know you have taken all steps to prevent your website to secure your website and prevent it from being hacked. However, there are many other things which can go wrong with your Joomla website. When you have a busy site, you can never have enough backups. The following are easy ways to have a complete set of backups of your Joomla website. Did I mention that each of these comes for free?
Backup your SQL data

Backing up the content of your Joomla website is critical. You will probably be able to recreate your template if you lose it, however recreating your content is a much harder thing to do especially if you rely on several 3rd parties / visitors for your the content.

The jombackup mambot from Jomres is a small mambot which when published creates a MySql backup, compresses the file and sends it to you. The default settings are enough, no playing around with parameters is required. Just enter your email address, publish and you'll soon start getting a daily backup right to your mailbox. Try not to obliterate your mailbox too, and don't use the same email server as the host of your site, so that if you lose your site, you don't lose your email too Wink

Backup your template / media / customisations etc.

These are things which do not change often ... so a simple FTP transfer to a backup area should be sufficient. You can also choose to use a component for your backups.

A good component for backup is the JoomlaCloner backup component. This allows you to backup and restore your website easily. It also allows you to move your website from host to host.

Another non-commercial one which comes to mind is the JoomlaPack component. This creates a zipped file of all the content in your website which you can just download. This also makes it easier for you to take a backup whenever you need.

January 15, 2009

Load a module within an article

0 comments
Did you know it is possible to actually load a module directly in your content? E.g. We want to load our Featured Articles module in an article rather than in a module position. We can do this using the Load Module Position defaultJoomla mambot.


Joomla 1.5

In Joomla 1.5, there is a default plugin which does this. You can call any module position in a content item with the following code:

{loadposition user4}

Remember, you have to enable the loadmodule plugin from the Plugin Manager.


Joomla 1.0

Edit: See bottom for a new way of doing this, using a 3rd party module though

The Load Module positions mambot allows us to load any mambot position as a mambot. Therefore to load the module in a content article we can use the following workaround.

* From the Template Positions (Site > Template Manager > User Positions), choose a module position which is not used in your template e.g. user8. If all your positions are used in the template, create a new position.


Create a new template position

* Assign the module you want to display to the position you have chosen above - Modules > Site Modules. Make sure that Menu Item links is set to All (otherwise the position will not load)


Setup the module with all necessary parameters

* In your content item enter the following: { mosloadposition user8 } (be sure to remove extra spaces before mosloadposition and after user8, spaces were added intentionally in this example). This will be replaced by the content of the module(s) assigned to that position.

January 14, 2009

Testing Joomla site changes while site is offline

0 comments
Sometimes when you need to make drastic changes to your website, you put you site offline, so that your clients get a site offline message and don't see any temporary incorrect configurations.

You as the developer / administrator of the website need to be able to see the live changes. To do this you need to open a new tab / window (and connent to your live site url) in the same browser where you are logged on as administrator doing the backend changes. If you have maintained the browser session correctly the actual current content is generated beneath the site offline message. Other users who hit your site while the site is configured as offline will only see the site offline message, and only you (due to being logged on as administrator) will be able to see the changes.

The essential thing for this to work, is that you need to ensure that you need to have two windows / tabs running under the same browser session.

January 13, 2009

Switch on the Cache

0 comments
Switch on Caching to give your Joomla website an instant performance boost.

What is a cache?
Wiki says:

A Cache is a collection of data duplicating original values stored elsewhere or computed earlier, where the original data is expensive to fetch (due to slow slow access time) or to compute, relative to the cost of reading the cache. In other words, a cache is a temporary storage area where frequently accessed data can be stored for rapid access. Once the data is stored in the cache, future use can be made by accessing the cached copy rather than re-fetching or recomputing the original data, so that the average access time is lower.


What does this mean in terms of Joomla? Instead of hitting your MySql database with same queries over and over again, your data is stored to a local storage (in the Joomla cache directory) and retrieved from there, instead of from the database. This means that your database will perform better, and your website will feel faster, and be able to support more simultaneous users.

Joomla 1.5

Activitating the Joomla Cache is quite straight forward. From the Global Configuration, click on System Tab, and on the right hand side there is the Cache Settings section. Click Yes on Cache Settings, and put a reasonable amount in minutes (60 minutes should be quite good for most websites). Once you press Apply, Caching will be enabled.

Joomla 1.0

The standard Joomla cache is enabled from Site > Global Configuration > System > Cache Settings (or Site > Global Configuration > Cache tab for Joomla 1.0), and mark it as enabled.

Though there are components written for caching the out of the box caching will give your website an instant boost.

January 11, 2009

Changing the default frontpage

0 comments
Another easy to do but often asked question about Joomla is how to change the default homepage from the frontpage component to another page.

Joomla 1.0

The page which is displayed when you first hit a Joomla website is the first menu item in the main menu. Therefore, if you want to change the default frontpage, go to the main menu (Menu > mainmenu) and change the ordering of the menu items such that the page you want to display first is at the top of the list.


Joomla 1.5


In Joomla 1.5, this has become easier to handle. You just go to the main menu
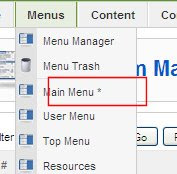
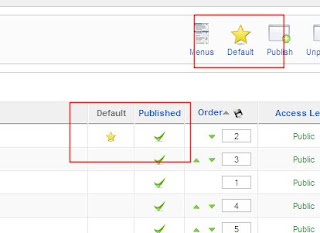
where your homepage is, select the menu item, and mark it as default. You'll notice that the menu which is default is marked with a start next to it. You'll also notice that in the Menus module, there is an asterisk in the menu which contains the default frontpage.


The images show the default icons which are used to set a menu item as the default frontpage.

January 10, 2009

Customising the Joomla Frontpage

0 comments
Audience: Joomla Newbies

This simple question is asked over and over again on the Joomla forums by newbies. The most popular question would be, how do I change from two columns to one column display.
Understanding the FrontPage component

The Joomla frontpage is a component which allows you to control how your homepage looks. It is slightly different from standard components in the fact that its configuration is not done via the Components menu. Instead you need to find the Home link in your main menu. In a default installation the Home points to the frontpage component.

To customise the look and feel of the frontpage you need to edit the Parameters of the Home menu item link. Therefore go to Menu > mainmenu > and click on the Home link.

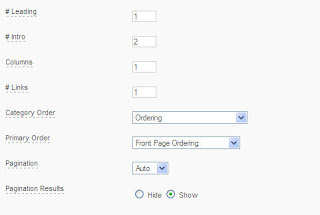
Joomla frontpage parameters

#Leading - This parameter determines the number of full width articles to display. Articles displayed in the Leading will have the Intro text displayed. This setting overrides the columns parameter i.e. if you have decided to have 2 columns and 1 items in the leading intro you will have a layout as follows:

Article 1 - Full Width (Row 1 - Leading)

Article 2 (Row 2, Column 1) Article 3 (Row2, Column 2)

Article 4 (Row 3, Colum 1) Article 5 (Row 3, Column 2)

Columns - the columns determines how many columns will feature in each row. If you want more than a single column, set the number of columns here.

#Intro - the number of articles whose Intro text will be displayed (excludes the number of items in the Leading parameter).

#Links - the number of links to articles to display (excludes the number of items in the Leading and Intro parameters). Items showed in the Links section will feature just the title of the article (with no Intro text displayed).


Change Welcome to the FrontPage (Joomla 1.0)

One of the annoying things in Joomla 1.5 is the way you can't seem to ever get rid of the Welcome to the Frontpage message! Here is how to change it.

To change the Welcome to the FrontPage message you need to change a system parameter in the Home link. Go to Menus > Main Menu. Here you will find the Home link. Click on the link. On the right of the screen there are a number of groups of parameters:

* Basic - an explanation on how to customize these can be found here
* Advanced - defines the order of articles on the frontpage
* Component - a number of parameters related to the Frontpage component
* System - this is where we find the title which we want to get rid of!

One of the System Parameters is the Page Title, which by default is Welcome to the FrontPage! Change this to what you prefer, or else you can choose not to show it.

January 07, 2009

Hiding a menu once logged in

0 comments
Have you ever wanted to hide one of your menus if your users have logged on? The following small template hack will hide your menu once your user has logged on.


The idea behind this is to actually load a particular position (the menu position) only if the user has not logged in:


Joomla 1.0

if( !$my->id )mosLoadModules ( 'left' );

and should be placed in the index.php of the template you are using (/templates//index.php). The code will hide all modules which are assigned to the left position. If you only want to hide your menu item, you should create an additional position in your template (e.g. hidingmenu), assign your hideable menu to this position and then hide that position only.

if( !$my->id )mosLoadModules ( 'hidingmenu' );


Joomla 1.5

This has changed for J1.5

$user =& JFactory::getUser();
$user_id = $user->get('id');

This returns the user id of the user. Therefore the code to do this is check whether the current user has a valid id (i.e. they are logged), if not load the module:
$user =& JFactory::getUser();
$user_id = $user->get('id');
if (!$user_id)
{
?>

}
?>

January 06, 2009

Sorting and Ordering

0 comments


Joomla provides a various sorting options for articles, sections, categories, menu items and other content. These tend to confuse users due to so many different possibilites.

The best thing is to define all items to be shown by Ordering. Then manually adjust the Ordering. However, instead of using the Ordering dropdown where you would have to go into each menu and select the ordering from the dropdown (and sometimes the dropdown may misbehave and not do exactly as specified):

Ordering Dropdown

you should be using the content items listing to change the ordering. You can either use the up / down arrows to move the item up or down. Or even nicer you can enter the order into the boxes, and once you have determined the correct order click on the diskette to save the order.

January 04, 2009

Removing Joomla Footer

0 comments
How to change / remove the Joomla footer
(remove joomla! is free software released under the gnu/gpl license)

Removing / changing the powered by Joomla! footer message

Although we all know what a great content management system Joomla is, sometimes situations call for the link not to be visible in your website footer.

Joomla 1.5

With Joomla 1.5 if you want to remove the footer, simple go to Extensions > Module Manager and unpublish the footer module. If you want to change the text, go to the language directory, go to the folder of the language you want to change, find the mod_footer.ini and change the text in there to whatever you want your text in the footer to be!


Joomla 1.0

To remove this from the default (1.0.x) template, you need to browse via ftp or otherwise to the file includes/version.php. Open it with your favourite editor, find the $URL line and change it to your liking. If you want nothing at all leave the line as $URL = '' (2 apostrophes). Do not remove the whole line because you might break your template.

This applies to the default template (rhuk_solarflare_ii). Other templates are likely to not use the URL and use their own links. You would have to use some kind of software on your local installation which looks within text files, and search for the text you want to change. Once you find it, you can change it to suit your needs.
Other Solutions

These are solutions suggested on the Joomla forums. These may or may not apply for your case.

1. Within your template's index.php file.
2. Within the /includes/footer.php file.
3. Within the language files.


A little explanation of how these methods are inter-related:

Each template set lives in its own sub-folder within /templates//
A template consists of:
an index.php (not to be confused with the scripts index.php in the installation root.
a css file usually css_template.css contained within /templates//css/
additionally image files within /templates//images/

/includes/footer.php is part of the core distribution of the script.

Your template's index.php file 'includes' - programmer speak for merges - footer.php into the final output of the page.
footer.php itself retrieves the Copyright text from the languages files.


There are pros and cons to either of these strategies, which I will explain as I go.

1. Editing your template's index.php so as not to include includes/footer.php and to simply place your text directly into the template.
Pros: Quick easy and efficient. It will also survive any upgrade of the core installation.
Cons: If you change templates, or use multiple templates you will have to replicate your edits throughout multiple templates.
Specifics:
Find and remove this line from the file /templates//index.php


2. Editing includes/footer.php so it does not retrieve the copyright info from the language files. Instead enter your own details here.
Pros: Again fairly quick and easy - possibly more efficient as the info will be available throughout multiple template sets.
Cons: The includes/footer.php file is part of the core distribution - it gets overwritten when you upgrade your favourite CMS.
specifics:
COPYRIGHT; ?>

URL; ?>

Find and remove these lines, or similar from the /includes/footer.php file, and replace with your own html or php.

3. Editing the language files directly - so that footer.php retrieves your info.
Pros: does the job
Cons: less transparent to anyone who takes over from you as editor. Also prone to being overwritten when you upgrade your favourite CMS.
Specifics: edit the file /languages/english.php


Some people have suggested moving the includes/footer.php file, for example into your template's folder, and editing the template to include this file.
Pros: still fairly quick and easy, and will survive an upgrade of the core CMS.
Cons: only compatible with templates that have been edited to work this way. Other templates may cause an error when the file is not found in its default location.

January 02, 2009

Working with text

0 comments
  1. In CorelDRAW 8 there's a feature of automatic node tracking. When it is on, a pointer turns into the Shape tool whenever you move it over a curve node. However if you press "Z" you enable a node tracking for text objects. Hold down "Z" key and move over a character node. The pointer turns into the Shape tool and you can drag separate characters by their nodes.
  2. To change text kerning using the keyboard, select two or more characters of Paragraph or Artistic text with the Text tool, then hold down Ctrl+Shift, and press ">" or "<" to either increase or decrease the space between characters.
  3. By Pressing Ctrl key while you drag a character with the Shape tool you can constrain it to the text baseline.
  4. While in text editing mode, you can use Ctrl+B to apply bold to selected text, Ctrl+I for italic, Ctrl+U for underline. You can also set text justification by pressing Ctrl+N to apply no justification, Ctrl+L – justify left, Ctrl+E – center, Ctrl+R – justify right, Ctrl+J – full justify, Ctrl+Shift+A – All Caps, Ctrl+Shift+K – Small Caps. Pressing Shift+F3 brings up Change Case dialog and Ctrl+Shift+C toggles display of non-printable characters. Alt-F3 invokes Find Text dialog.
  5. If you press Ctrl+M with Paragraph text object selected you can add/remove bullets to/from text.
  6. You can interactively change the point size of selected text (object) if you press Ctrl and 2, 4, 6 or
  7. on the numeric keypad. Ctrl+8/2 increases/decreases the text size in steps of 1 point. Ctrl+6/8 increases/decreases the text size in steps specified in text size drop-down list. These steps are 6, 7, 8, 9, 10, 11, 12, 14, 16, 18, 24, 36, 48, 72 and so on.
  8. Pressing Ctrl+F8 converts artistic text object to paragraph text object and vice versa.

January 01, 2009

Selecting and transforming objects

0 comments
1. You can select an object that is a part of a group by clicking it while holding down the Ctrl key.
2. If you marquee-select objects with the Alt key down, then you select objects that are not only surrounded with the marquee completely but also only "touched" with it.
3. To select an object completely obscured by another object, just click where the underlying object should be with the Alt key down.
4. To stretch an object from its center hold down Shift, and drag one of the side selection handles. To stretch an object in increments of 100%, hold down Ctrl as you drag a selection handle. To stretch an object vertically and horizontally at the same time, hold down Alt as you drag one of the corner selection handles.
5. You can rotate and skew an object freely if you hold down Alt key while transforming it.
 

Copyright 2008 All Rights Reserved | Blogger Template by Computer Science and Computer Tips